Full Flutter UI Kit - Beauty Salon Booking App
Description
Flutter Beauty Way
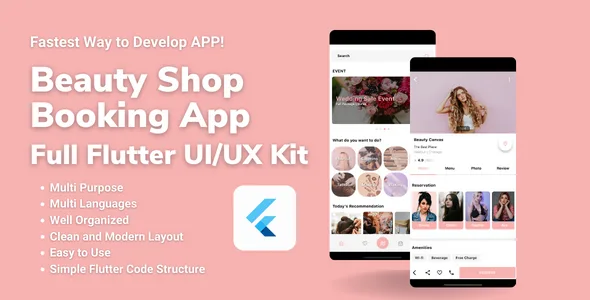
<iframe title=”YouTube video player” src=” width=”560” height=”315” frameborder=”0” allowfullscreen=”allowfullscreen”></iframe>Flutter Beauty Way is a comprehensive Flutter app template for beauty parlour booking and connecting with beauty experts in a parlour.
It consists of more than 30 screens for beauty parlour booking, all developed using Flutter. Each screen is fully customizable, user-friendly, and crafted with Flutter’s powerful features.
This template provides you with a solid foundation to build your own beauty app, leveraging the flexibility and performance of Flutter.
View Full Page
50px)] flex-col gap-1 md:gap-3 lg:w[calc(100%-115px)]”> <iframe style=”position: absolute; width: 100%; height: 100%; top: 0; left: 0; border: none; padding: 0; margin: 0;” src=” width=”100%” height=”100%” allowfullscreen=”allowfullscreen”> </iframe>Our UI Kit provides a seamless booking experience with the following basic steps:
- Category Selection: – The user selects a desired category from options such as haircuts, coloring, etc.
- Parlor Listings: – Within the selected category, a list of parlors offering services in that category is displayed.
- Parlor Selection: – The user chooses a specific parlor from the provided list.
- Parlor Details: – The user can view essential information about the parlor, including its home, service menu with prices, photos, reviews, and more.
- Expert Selection: – Within the chosen parlor, the user selects a specific expert, such as a hair stylist.
- Expert’s Schedule: – The working hours or schedule of the selected expert is displayed to the user.
- Booking Confirmation: – The user selects a preferred date, time, and service from the available options and agrees to the service and refund policy.
- Payment and Reservation: – The user proceeds to make the payment to confirm the booking.
Our UI Kit simplifies the booking process and guides users through each step, ensuring a smooth and efficient experience. Customize and integrate these steps seamlessly into your app to provide a user-friendly and convenient booking system.
Quick Start GuideTo access the contents of the downloaded file, you need to unzip it. Once unzipped, you will find 5 individual zip files, with each zip file representing one project. You can extract the contents of each zip file separately to access the files and folders specific to each project.
Here are the steps to unzip the downloaded file:
1. Locate the downloaded file on your computer.
2. Right-click on the downloaded file.
3. Choose the “Extract” or “Extract Here” option from the context menu. This will start the extraction process.
4. Wait for the extraction process to complete. This may take some time depending on the size of the downloaded file and the speed of your computer.
5. After the extraction is finished, you will see the unzipped files and folders. Among them, you will find 5 separate zip files, each representing one project.
6. To access the contents of a specific project, select the corresponding zip file and extract it using the same process described above.
By unzipping the downloaded file and extracting the individual project zip files, you will be able to access and work with each project separately.
Flutter Version
- 3.10.5
Pubspec.yaml
1. Google Map
In the pubspec.yaml file, you will find the following dependency:
google_maps_flutter: ^2.3.1
This dependency enables the integration of Google Maps into your Flutter app. To use Google Maps functionality, you need to obtain a Google Maps API key from the Google Console and enter it in the appropriate files for Android and iOS.For Android:
- Navigate to
android > app > src > main > AndroidManifest.xml. - In this file, locate the
<application>tag and add the following line within it, replacingYOUR_API_KEYwith your actual Google Maps API key:
For iOS:
- Go to
ios > Runner > AppDelegate.swift. - Import the GoogleMaps package by adding the following line at the top of the file:
- In the GMSServices.provideAPIKey(“
YOUR_API_KEY“), replaceYOUR_API_KEYwith your actual Google Maps API key
2. Images
We would like to clarify that the images shown in the screenshots are sourced from Unsplash and are used for illustrative purposes only. Please note that the actual product package does not include these specific images. Instead, placeholder images are provided in the product. These placeholder images serve as a representation of where custom or desired images can be placed within the design.
To have a comprehensive view of the overall design with images:
- Dummy Data Images: (1) Navigate to the ` lib > dummy > dum_data.dart ` file. (2) Modify the image paths for each item, and the entire set of images will automatically change accordingly.
- App Images: Login Background, Onboarding, Category Images: (1) Go to the ` lib > setting > app_theme.dart ` file. (2) Adjust the image paths for each item, and the entire set of images will be updated accordingly.
You have the flexibility to either place the images in the assets folder and load them or use online image links . Simply modify the image paths accordingly to achieve your desired design with the appropriate images.
3. Icons
For the icons used in the product, we have utilized the built-in icons provided by Flutter, as well as the flutter_tabler_icons package version 1.2.0.
4. Languages
In our UI Kit, we have implemented translation using GetX, a powerful state management library. This enables you to easily add and support multiple languages in your app. With the translation feature, you can provide a localized experience to your users by adding any languages of your choice.
By leveraging GetX’s translation capabilities, you can create language files and map key-value pairs for different languages. This allows you to dynamically switch the app’s language based on user preferences or system settings. With just a few simple steps, you can enhance the accessibility and usability of your app by making it available in multiple languages.
Experience the convenience and flexibility of language translation in our UI Kit. Customize the translations to meet the specific needs of your app and provide a seamless, multilingual experience to your users.
Assets Folder
- app_images
- dummy_images
Description
Within our UI Kit, you will find an Assets folder that includes two sub-folders: “app_images” and “dummy_images.” Here’s a description of each:
- app_images: – This folder contains images that are specifically used within the app for various purposes. – It includes category images, which are associated with different categories within the app. – Additionally, there are onboarding images that are utilized during the onboarding process. – The login_background image is used as the background for the login screen, providing a visually appealing backdrop.
- dummy_images: – The dummy_images folder contains a collection of images that are used for virtual data within the app. – These images are placeholders and serve to represent users, stores (beauty shops), store details, stylists, events, service menus, and more. – They are intended to provide a visual representation of the data and enhance the overall user experience. – As virtual data placeholders, these images can be easily replaced with actual content or customized to fit your specific needs.
By leveraging the images within the app_images folder and the dummy_images folder, you can create visually engaging interfaces, customize the app’s appearance, and showcase relevant content in a visually appealing manner.
Feel free to explore and modify these image assets to align with your app’s branding, content, and user experience requirements.
Dummy Folder
Our UI Kit provides dummy data for various components, allowing you to quickly populate your app with realistic sample content. The dummy data includes the following:
- dum_data: General dummy data for testing and placeholder purposes.
- event_data: Dummy data related to events and event listings.
- faq_data: Dummy data for frequently asked questions and their corresponding answers.
- magazine_data: Dummy data for showcasing magazine articles or content.
- notice_data: Dummy data for displaying announcements or important notices.
- reservation_data: Dummy data for managing reservations or booking information.
- user_data: Dummy data for user profiles or user-related information.
- review_data: Dummy data for displaying user reviews or ratings.
- staff_data: Dummy data for staff members or employees.
- store_data: Dummy data for store or business information.
Using these data models, along with dummy images stored in the Assets folder, you can easily populate your app with realistic sample content. If you wish to use different images, simply replace the existing data in the Dummy section with your desired content.
This allows you to quickly visualize and test the functionality of your app with different types of data, creating a more engaging and realistic user experience.
Experience the convenience of our dummy data feature in the UI Kit, making it easier for you to prototype, test, and showcase your app’s functionality.
Model Folder
Our UI Kit includes various models that serve as the foundation for different components within your app. Each model is designed with the basic and necessary fields to fulfill specific functionalities. These models can be customized or expanded based on your specific client or business operation requirements.
Here is a description of the included models:
- category_model: This model provides the basic fields required for managing categories within your app.
- event_model: The event_model includes the essential fields needed to handle event-related data.
- faq_model: This model contains the necessary fields for managing frequently asked questions and their corresponding answers.
- magazine_model: The magazine_model consists of fields to store information related to magazine articles or content.
- notice_model: This model includes the required fields for managing announcements or important notices within your app.
- policy_model: The policy_model is designed to store information regarding different policies, such as refund policies or privacy policies.
- report_model: This model includes fields to manage report-related data or user feedback.
- reservation_model: The reservation_model contains the necessary fields to handle reservation or booking information.
- user_model: This model provides the essential fields to manage user profiles or user-related data.
- store_model: The store_model includes fields to store information about stores and staff members
These models offer a solid starting point for managing different aspects of your app’s data. However, you have the flexibility to add, modify, or extend these models based on your specific client’s requirements or the operational methods of your business.
Utilize our pre-defined models as a foundation to build upon and create a tailored data structure that perfectly aligns with your app’s functionality and business needs.
Screen Folder
- category_screen
- event_screen
- magazine_screen
- map_screen
- my_reservation_screen
- my_wish_screen
- profile_screen
- recommend_screen
- search_screen
- start_screen
- store_screen
Description
Introducing our UI Kit’s collection of well-designed screens that effortlessly create stunning interfaces. Each screen has been meticulously crafted to provide a seamless user experience and a visually appealing layout.
With our UI Kit, you have the freedom to customize and tailor each screen to your specific needs. You can easily attach, detach, and reorder components to create the perfect arrangement for your app. Whether you want to showcase different categories, events, magazines, maps, reservations, wishlists, profiles, recommendations, search results, or store information, our screens offer versatility and flexibility.
Our UI Kit’s screens empower you to build intuitive and engaging user interfaces without the hassle of starting from scratch. With the ability to customize the components and their placement, you can create a unique flow and presentation for your app.
Experience the convenience and efficiency of our UI Kit’s screens. Effortlessly create captivating interfaces that captivate your users and enhance their overall app experience. Start building your app today and unlock the potential of seamless screen design.
Widgets create screens – unleash your creativity and design visually appealing interfaces with ease using our UI Kit’s versatile screens.
Setting Folder
- app_color
- app_language
- app_policy
- app_theme
- app_root
Description
- app_color: Enjoy the flexibility of customizing the colors to your liking with ease. With our AppColors.main feature, you can effortlessly modify the primary color of your app, giving it a personalized touch that aligns with your brand or design preferences.
- app_theme: Take full control over your app’s branding and appearance. Not only can you modify the app name and slogan, but our app_theme feature allows you to easily customize the entire theme of your app. Tailor it to match your unique style or adapt it to different seasons or occasions effortlessly.
- app_language: Embrace a global audience by adding multiple languages to your app. While our UI Kit currently includes Korean and English, you have the freedom to incorporate any language of your choice. Expand your reach and provide a localized experience to users worldwide.
- app_policy: Stay in control of your app’s policies and ensure they align with your business requirements. With our app_policy feature, you can effortlessly modify the text related to refund policies, privacy statements, and more. Easily adapt your policies to meet legal requirements or address specific concerns, giving your users a transparent and trustworthy experience.
Utils Folder
- date_time_utils
Description
Within the UI Kit’s Utils folder, you will find a file named “date_time_utils.” This file provides simple functionality related to date and time operations. Here’s a brief description:
- date_time_utils: - This utility file includes functions and methods that allow you to manipulate and format date and time. - One of the functionalities provided is the ability to change the date time format. - For example, if you have a time value of “11:00” and want to convert it to “11:00 PM” format, you can utilize the date_time_utils to achieve this conversion effortlessly.
By utilizing the date_time_utils, you can easily handle date and time formatting within your app, ensuring a consistent and user-friendly experience. Feel free to explore and leverage the provided utility functions to enhance your app’s functionality related to date and time.
Widgets Folder
- dialog
- get_app_bar
- get_banner
- get_bottomsheet
- get_button
- get_empty
- get_field_decoration
- get_html
- get_image
- get_image_view
- get_list_tile
- get_space
- get_title
- get_view_more_title
- get_wrapper
Description
Introducing our UI Kit, featuring a collection of custom widgets that are designed to be incredibly easy and simple to use. Say goodbye to lengthy widget code!
With our UI Kit, you can save valuable time by utilizing our pre-built custom widgets. No more spending hours writing complex widget code from scratch. We’ve taken care of the heavy lifting, allowing you to focus on building your app’s functionality and user experience.
Our custom widgets are carefully crafted with clean and concise code, making them a breeze to integrate into your Flutter projects. Whether you’re a beginner or an experienced developer, you’ll appreciate the simplicity and efficiency of our UI Kit’s widgets.
Experience the convenience and time-saving benefits of our UI Kit’s custom widgets. Simplify your development process and create stunning interfaces with ease. Get started today and enjoy the benefits of hassle-free widget implementation.
No more long widget code – just effortless development with our UI Kit’s intuitive custom widgets!
Support
We value our clients and believe that great support is the key to success.
If you have any issues or questions, you can reach out to us for support through the following methods: Email: hijack0713@gmail.com
We offer support during the following working hours:
Working Days: Monday to Friday
Working Hours: 10:00 AM to 7:00 PM
Time Zone:GMT+9
Please note that according to Envato policy, installation/setup and customization/modifications are not included in the free support package. Free support is specifically meant for addressing any bugs or errors in the original source code. We do not provide installation or customization assistance as part of the free support offering.
We kindly request you to review all the information and product features before making a purchase.
We do offer customization services; however, please note that additional features or specific changes to the product are not included in the Free Support package.
Should you require any further clarification or have any questions, please don’t hesitate to reach out to us. We are here to assist you.
External listing. code.market does not sell this product and does not process payment for it. Pricing, payment, delivery, licensing, refunds, and support are handled by the third-party merchant on its own website. We may earn an affiliate commission from a referral. Details.
Products of the Week.
Submit🥇

STOP GUESSING WHAT TO POST
AI that learns your brand voice and builds a month of consistent, on-brand social content: carousels, posts and hooks that sound like you, not like everyone else's AI.
SaaS · 3,247 views · 28 clicksSaaS · Week 45 · 3,247 views · 28 clicks
🥈

Conversational Backlinks for Busy Founders
Place Backlink Relevant Conversation for your domain across Forums and Conversations
Website · 40,650 views · 217 clicksWebsite · Week 45 · 40,650 views · 217 clicks
🥉

upvote.club
Free Social Media Engagement that Helps Boost Your Content. Upvote Club supports 19 social networks with 100+ engagement actions in one dashboard. Add links to your posts and get free engagement from real users.
SaaS · 38,748 views · 111 clicksSaaS · Week 45 · 38,748 views · 111 clicks
#4

Substack Posting API
Onboard your Agent to Substack. Write Publish on Substack via API
SaaS · 57,785 views · 197 clicksSaaS · Week 45 · 57,785 views · 197 clicks
#5
Seenshot App
Free, Fast, MacOS Screenshot app. Make Screenshot cmd+shift+2 and send it via link
Desktop App · 27,187 views · 119 clicksDesktop App · Week 45 · 27,187 views · 119 clicks
#6

Hand-Placed Backlinks $9.99 per link. Flat rate.
Buy hand-placed forum, Q-A and directory backlinks. Flat $9.99 per link, no subscriptions — you only pay for approved listings.
Website · 3,096 views · 18 clicksWebsite · Week 45 · 3,096 views · 18 clicks
#7
Free Invoice Generator - PDF Invoices in Your Browser, No Sign-Up
A free invoice maker for freelancers and small businesses: fill in the invoice, check the live preview, and download a PDF that looks exactly like it. Any currency, tax per item, three templates, no sign-up, and nothing leaves your device.
1,786 views · 16 clicksWeek 45 · 1,786 views · 16 clicks
#8

Merge PDF Files Free - Combine PDFs in Your Browser, No Upload
A free PDF merger for office workers, students, and freelancers: combine PDFs and images into one file in the browser, reorder files and pages, pick page ranges, keep bookmarks, and open password-protected PDFs. Nothing is uploaded, no sign-up, no watermark.
1,660 views · 13 clicksWeek 45 · 1,660 views · 13 clicks